
OustEd - Editor for Oust
February 2024 (updated July 2026)
The editor used to make my game Oust, available here:
OustEd allows the creation of whole new fields of asteroids to play through and is a (slightly) improved version of what I used to make the original Corvus asteroid field.
Setting up OustEd
OustEd allows the creation of asteroid fields for Oust and is available if you buy the full version of the game. It is the tool that I used to make the game's levels (or "asteroids") and, although I tried to keep one eye on usability when I was writing it, I'll freely admit that it's a bit obscure and rough around the edges.
I'm not aware of another editor release for PICO-8 like this so Ousted is a bit of an experiment really. Hopefully it works well enough that people can use it.
I intend to give OustEd and Oust some love in the near future.
For the longest time during development, the program only barely fit in PICO-8 and it uses a lot of the token saving techniques that Oust itself uses. Right at the end of development I was able to remove several functions from the editor that only the game was using so there are more tokens available now, but it's still fairly tight. There is some scope for making it a bit more friendly so if something is completely unworkable for you, please say.
Save Game Editor
Oust also acts as a save game editor to allow for testing. Obviously it can be used to cheat in the game a bunch too. If it helps you enjoy the game, go for it.
Generally I've found the following makes save edits "stick", but YMMV:
exit Oust
(re)start OustEd
make save game changes
restart Oust
Running Oust and OustEd concurrently isn't great for save game consistency so if you're bothered about that only run one of the apps at a time. For actually editing asteroids I usually ran both together and sometimes used multiple instances of OustEd.
I even had a flagging system so that modifying the asteroids file from one instance of OustEd would trigger any other instances to reload, but I had to pull that out to save tokens. It was handy when setting teleport destinations between asteroids. I might try to squeeze it back in, especially if someone requests it.
db_oust_levels.p8
OustEd reads and writes the file: db_oust_levels.p8. This is also the file that Oust reads to get the data for an asteroid field if you hold Z/![]() when starting Oust. If you're having trouble getting the file to load when freshly starting Oust, try going to the menu and choosing to Reset Cart and hold Z/
when starting Oust. If you're having trouble getting the file to load when freshly starting Oust, try going to the menu and choosing to Reset Cart and hold Z/![]() . To play sets of levels aka "an asteroid field", make sure your levels/asteroids file has that name and is in the cstore location for your system:
. To play sets of levels aka "an asteroid field", make sure your levels/asteroids file has that name and is in the cstore location for your system:
Windows: C:\Users\***your_user***\AppData\Roaming\pico-8\cstore
Mac: /Users/***your_user***/Library/Application Support/pico-8/cstore/
Linux: /home/***your_user***/.lexaloffle/pico-8/cstore/
Tested on Ubuntu 22(Raspberry Pi: probably the same as Linux).
If you are running OustED from within PICO-8 then you can place files in the same directory as the OustED program instead of the cstore directory.
To play the default asteroids (the "CORVUS" field), restart Oust without holding Z/![]() .
.
OustEd is supposed to create a blank file if it can't find a db_oust_levels.p8 in the right location. If you can't launch OustEd it may be because it can't access the location where it expects db_oust_levels.p8 to be or the routine to make a blank asteroid field has failed. If so, place one of the example db_oust_levels.p8 files in the right location with read/write access.
The following db_levels.p8 files are provided in the package for OustEd as examples:
db_levelsLUDOS_v1_1_0.p8: a few asteroids showing what you might get by following the Your First Asteroid guide below.
db_levelsPICA_v1_1_0.p8: the asteroid field that is used by the Oust demo. The first 12 asteroids match the full game (more or less), but the final asteroid is unique to this field.
db_levelsCORVUS_v1_1_0.p8: the data file from the full game. There are 42 asteroids in total.
Note: editing save game data in OustEd while working with the "CORVUS" field will update progress in the built-in game since the asteroid field name "CORVUS" will match with how the game identifies the save for the built-in asteroid field.
If you want to keep progress separate then rename the asteroid field you're editing to something other than "CORVUS".
The same is true of the "PICA" field with respect to the demo.
I've found it most convenient to make a copy of the field I'm working on and rename that to db_levels.p8 then when I want to switch over to edit a different field I can either discard those changes by deleting the file and copying another one or discarding the old version and renaming what I'm currently working on with the name of the field (and a version number).
I'd have liked to make an interface in the game to allow the player to choose the asteroid field to load, but there's just no way I could have squeezed that into the PICO-8 cart for it, I think.
Your First Asteroid
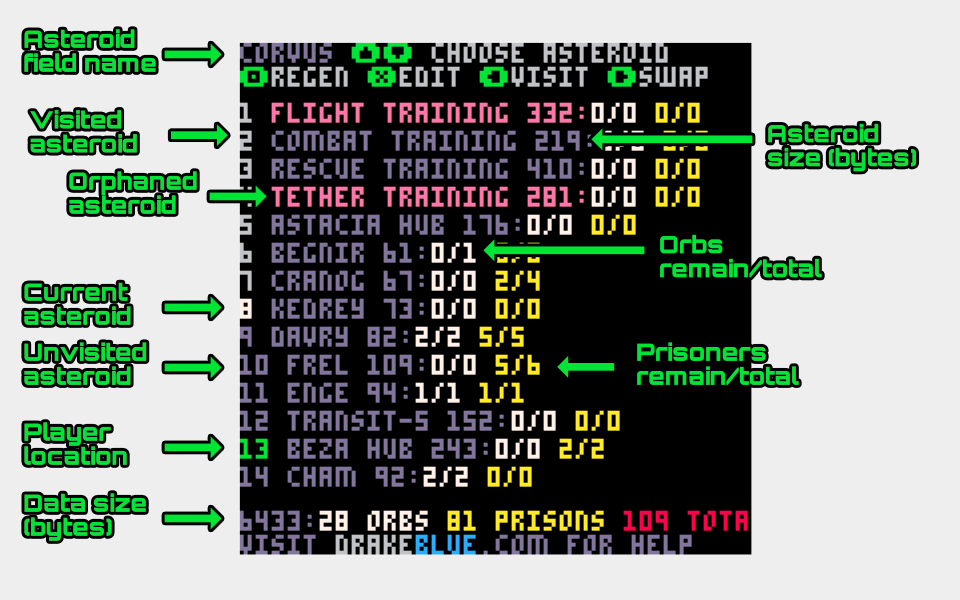
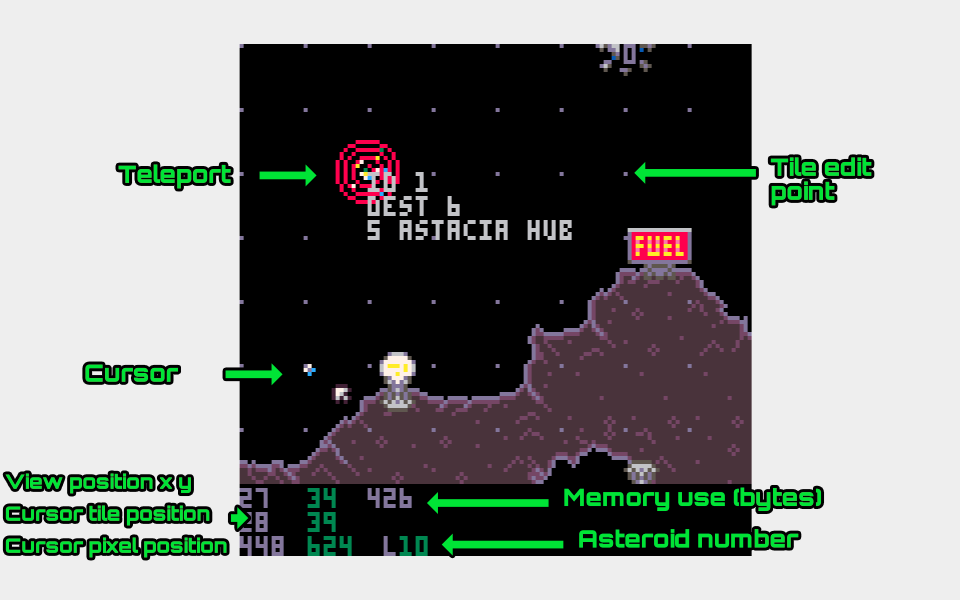
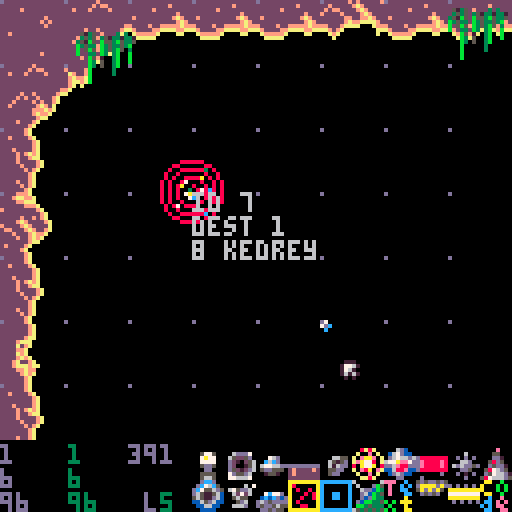
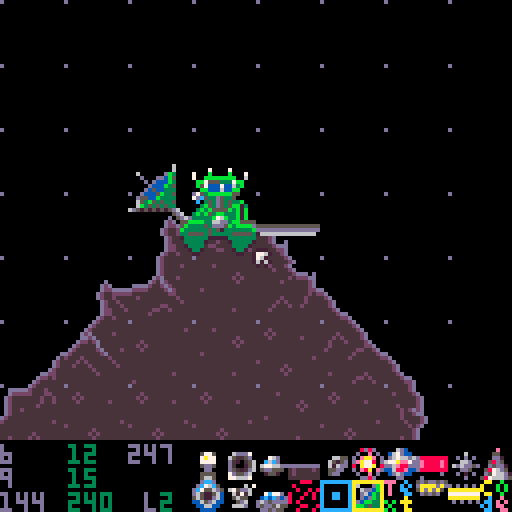
Run OustEd. You should see the Asteroid Select View showing something a bit like this:
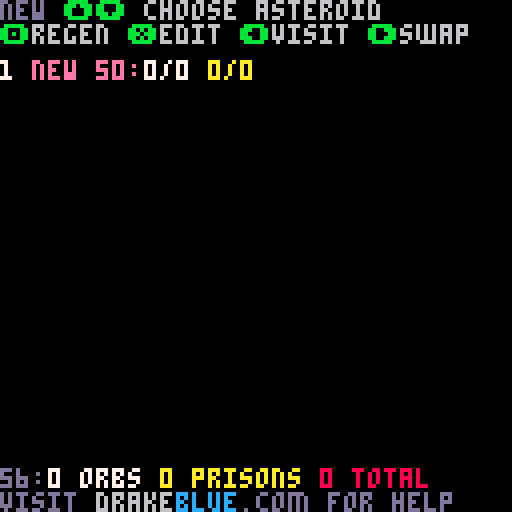
The "1" beside the first asteroid in the field (both called "NEW") should be flashing. To regenerate this asteroid into something a bit more interesting than the default, press Z/![]() to go to Regenerate Mode for the asteroid.
to go to Regenerate Mode for the asteroid.
You should see something like the following, but if, for instance, you pressed X/![]() and find yourself in the Edit View, you can press R to go to the Regenerate View or Y (then Y again) to return to Asteroid Select View and then try Z/
and find yourself in the Edit View, you can press R to go to the Regenerate View or Y (then Y again) to return to Asteroid Select View and then try Z/![]() again.
again.
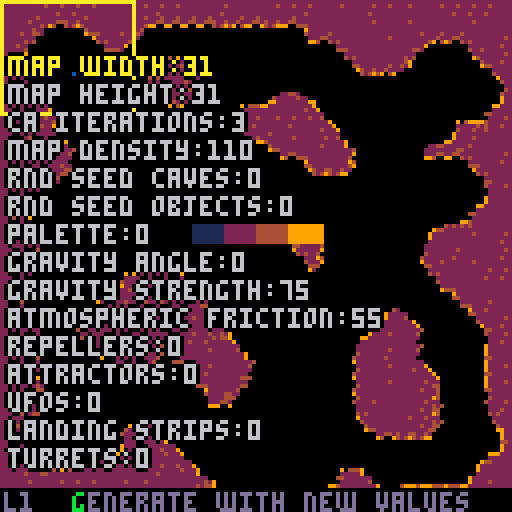
Generating your asteroid
In the Regenerate View, choose some dimensions for your asteroid e.g. 64 by 95 and start generating some caves for the player to fly through.
Highlight the MAP WIDTH option using UP and DOWN, then use LEFT and RIGHT to change the values beside the option.
Hold Z/
 while pressing a direction to move option or change an option's value by increments of 10.
Do the same for the MAP HEIGHT option.
-
When you've set the values you want for the asteroid's dimensions, press G to generate the cave walls for it. Any changes you make to the option values in the Regenerate View aren't applied to the current asteroid until you press G.
OustEd tries not to regenerate everything from scratch unnecessarily, but you can press F to force this if you want.
Hold Z/
and press G to try to regenerate without wiping out manual objects or cave changes. Holding X lets you look at the mini map of the whole asteroid without the options in the way.
You can adjust how much rock vs space there is by changing the MAP DENSITY value. Choose around 100 for a reasonable balance; lower values result in more space and less rock, higher values give the opposite.
Change the CA ITERATIONS value to make the caverns more or less smooth. A value of zero means no smoothing at all, higher values get more and more "blobby".
You can also use edit the RND SEED CAVES option to completely change from what random value generation of your asteroid starts. Try a few values and you can see how much the topology can be different.
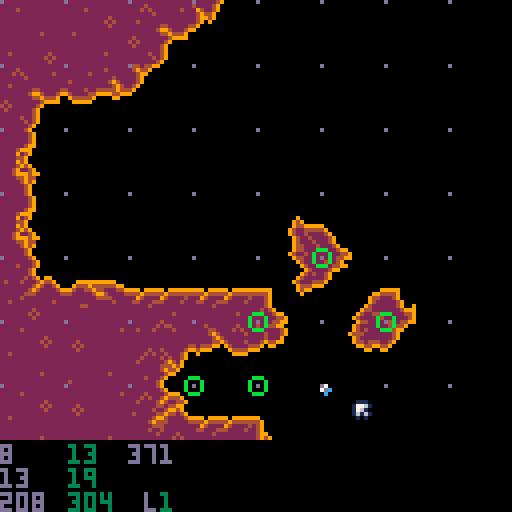
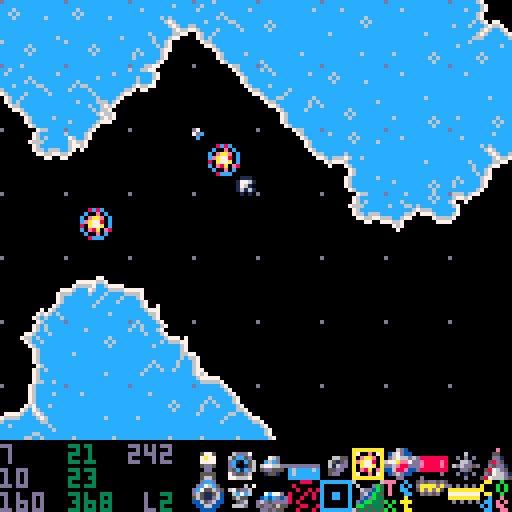
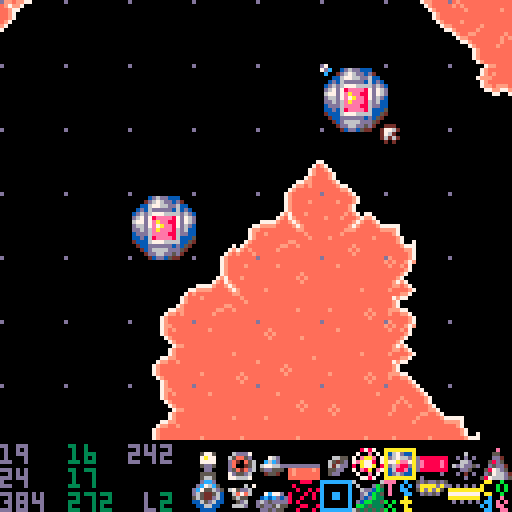
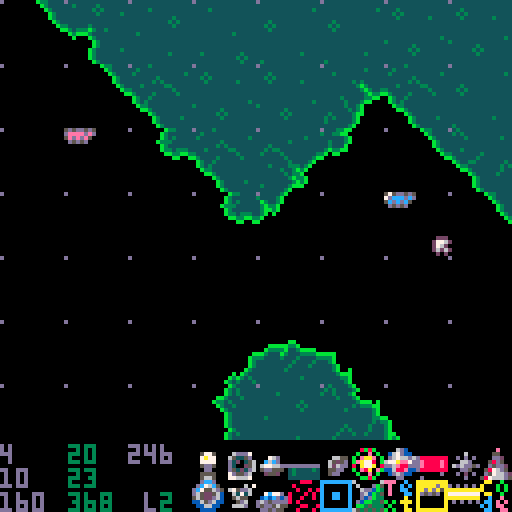
Alter these five values (and keep regenerating with G) until you see something that you like. You might get a result a bit like this:
For a closer look or if you're happy with what you've got, press E to enter the Edit View. You can get back to Regenerate View from Edit View by pressing R.
Editing your asteroid
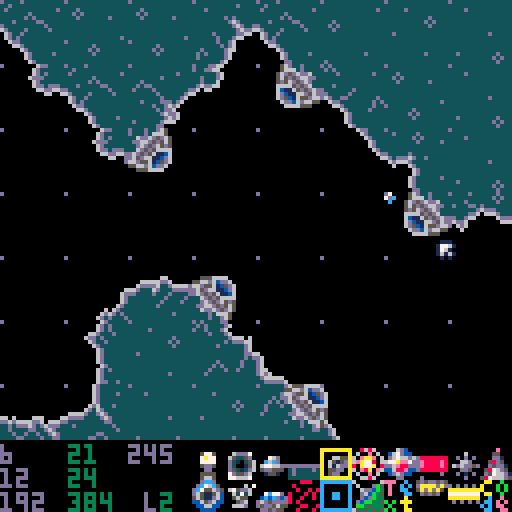
Edit View shows your asteroid at the same scale as it's shown in the game.
You can scroll about the map using the directions. To scroll faster hold down Z/![]() . This also shows the mini-map, with the current view area indicated by the yellow box.
. This also shows the mini-map, with the current view area indicated by the yellow box.
The fastest way to move about the asteroid in Edit View is to hold down Z/![]() to show the mini-map then use the mouse cursor to click on where you want to see. The top left corner of the yellow box will move to where you click, then let go of Z/
to show the mini-map then use the mouse cursor to click on where you want to see. The top left corner of the yellow box will move to where you click, then let go of Z/![]() .
.
Every asteroid in Oust needs a checkpoint or teleport for the ship to begin at so let's add a checkpoint. Press E to show the object palette, then find the checkpoint icon. It's the blue square with the blue dot in the bottom row, fifth from the left. Click on the icon then move the cursor up to the map view.
You should see a much larger blue box with a smaller box in the middle flashing about the cursor. Find an empty point in space where you want your checkpoint and left-click to add it. You'll know it's worked because the two blue squares for that checkpoint should stay on the map without flashing after you move your cursor away.
If you've started from scratch for this first asteroid then you should see a little icon of the player ship appear by the checkpoint you've just made. If you don't, you can place the ship there anyway: hide the object palette by pressing E again and hold X/![]() . Click on the checkpoint and answer Y to the "ARE YOU SURE?" box that appears. An icon of the Oust ship should appear by the checkpoint. This indicates where the player will start the next time the game is begun.
. Click on the checkpoint and answer Y to the "ARE YOU SURE?" box that appears. An icon of the Oust ship should appear by the checkpoint. This indicates where the player will start the next time the game is begun.
Save your asteroid field to the db_oust_levels.p8 cart by pressing Return or P then using the Up and Down keys to select the "STORE TO ASTEROIDS CART" option. Choose it with X/![]() and answer Y to the "ARE YOU SURE?" box that appears here as well.
and answer Y to the "ARE YOU SURE?" box that appears here as well.
Playing your asteroid
You can try your new asteroid in the game now. Start Oust while holding the Z/![]() button. Once you see a spinning load icon in the top left corner of the screen you can release it.
button. Once you see a spinning load icon in the top left corner of the screen you can release it.
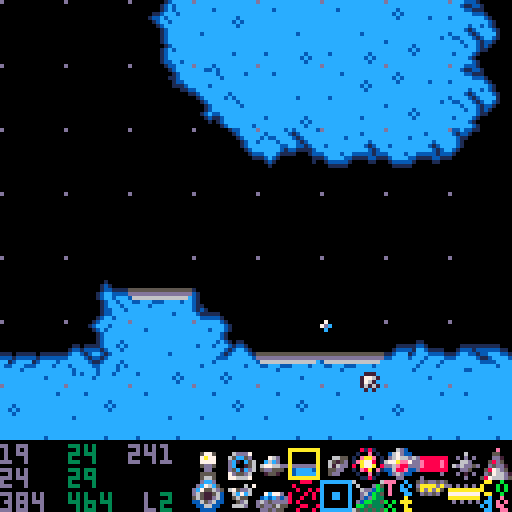
If your asteroid field has loaded correctly then you should see the word "NEW" in the bottom left corner of the title screen instead of "CORVUS" which is usually there.

Choose the current save slot. You should find yourself entering the new asteroid you've made at the checkpoint that you added. You can fly about the caves, but you'll find there's not a lot to do and no way to leave.
Adding more to your asteroid
Perhaps we could add more things to your asteroid. Go back to OustEd, enter Edit View from the Asteroid Select View by pressing X/![]() and similarly to how you added the checkpoint you can add futher objects manually.
and similarly to how you added the checkpoint you can add futher objects manually.
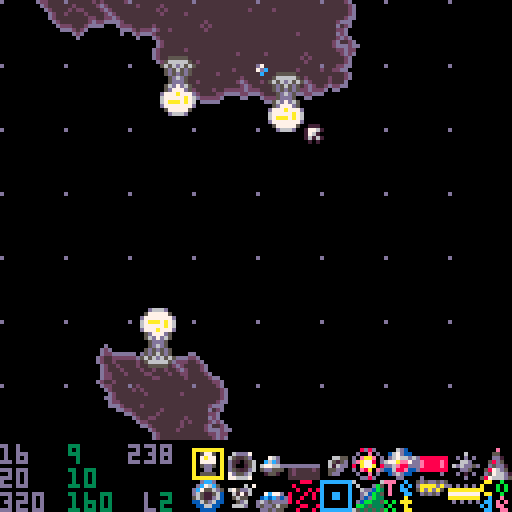
Make sure you can see the object palette by pressing E. Choose the green icon immediately to the right of the checkpoint with the mouse cursor. This lets you place transmitters. Add one somewhere near your checkpoint by clicking on the map where there's a flat bit of cave wall.
OustEd doesn't try to stop you adding objects in places they probably shouldn't go, but will mark them as potentially 'BAD'. BAD objects may behave as you intend in the game, but they may not work like you want them to or even crash it.
Now look for a horizontal piece of ground on your map to place a prison and a landing strip near to it that a prisoner can run to. Prisoners are very bad at climbing so there can't be a vertical cliff between your prison and landing strip of more than two pixels that the prisoner would need to ascend otherwise the prisoner may not be possible to rescue. Also, try to make sure there isn't a big enough drop from which your prisoner could fall to their death close to their prison.
Remember to store your changes to cart from the Return menu.
One more thing you might want to do is to rename your asteroid and the asteroid field its in to something slightly more inspiring than "NEW". Exit Edit View by pressing Y then answering Y to the "ARE YOU SURE?" box that appears. This will take you back to the Asteroid Select View.
Press Return here and find the "RENAME ASTEROID" option and selecting it with X. Use Backspace to delete "NEW" and give your asteroid a short, snappy name like "UNOS". Then find the "SET ASTEROID FIELD NAME" option and change it something like "LUDOS". Your name needs to be short enough to fit on the screen in the game and to avoid taking up storage space. Save your asteroids cart from the Return menu.
Note: Oust uses the asteroid field name to separate out save files so when you change the name of the field in the current db_oust_levels.p8 file any save data will seem to disappear.
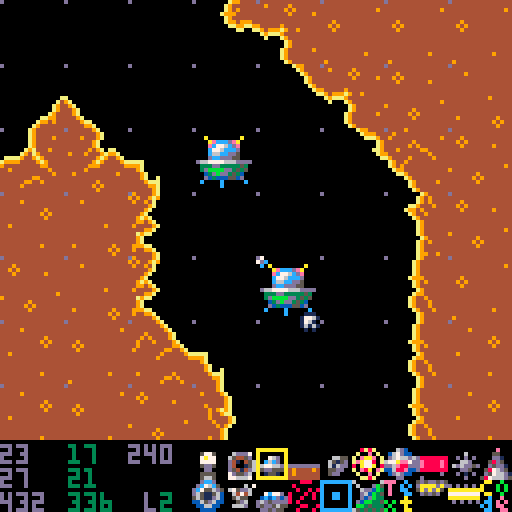
If you try the game now you'll probably find it quite easy to rescue the only prisoner in your asteroid field and so complete your mission and bask in the glory of the end game screen. To add a little more challenge you can add some procedurally generated enemy objects.
Run OustEd again and choose Regenerate View using Z/![]() (or R if you've come from Edit View). Move down through the options until you see TURRETS and set the number there to 20, for example. Choose 5 for UFOS and some other values you fancy for the options between ATTRACTORS and WEED. Then press G to regenerate the map.
(or R if you've come from Edit View). Move down through the options until you see TURRETS and set the number there to 20, for example. Choose 5 for UFOS and some other values you fancy for the options between ATTRACTORS and WEED. Then press G to regenerate the map.
If you hold X when an option that generates objects is selected then where those objects are should be shown on the map.
If you don't like where the objects are you can change the RND SEED OBJECTS value and different positions will be chosen. For more about tweaking the procedurally generated content in your asteroids see Edit View in the Reference section below.
Store your changes to cart and then fire up Oust and you can try your slightly more challenging asteroid.
Note: you may need to wipe your save in Oust or use a different save slot to ensure that the prison isn't empty in your asteroid when you test it again. You can also toggle individual prisons and orb statuses from within the Edit View of OustEd by clicking on them with the object palette visible.
Reference
Asteroid Select View
This is the view that is enabled on startup. It lets you work with a list of the asteroids in the current field and allows you to select one to edit.
Use the Up and Down cursor keys to choose an asteroid to edit.
Press Z/
to go to Regenerate View.Press X/
 to open Edit View for that asteroid.
Press Left to mark the current asteroid as visited in the current save game slot.
Press Right to swap the asteroid with the asteroid below in the list if there is one. This is how to re-order asteroids.
OustEd attempts to preserve teleport destinations when adding, re-ordering or deleting asteroids, but watch out for problems if you do it a lot. OustEd won't be able to help if teleports are created by code objects.
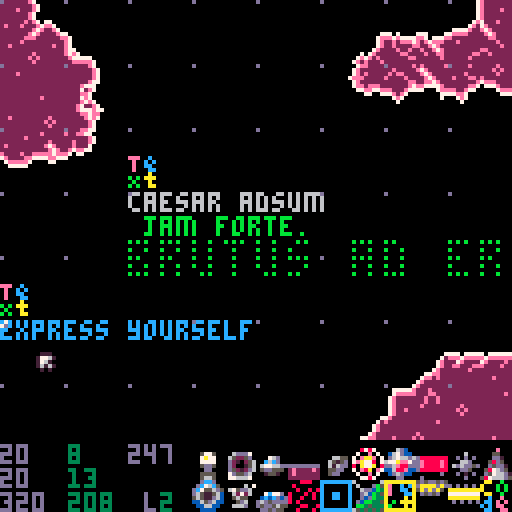
What OustEd doesn't do is try to preserve visits, orbs and prisoner data - that will get mixed up if you change the asteroids field.Orphaned asteroids, or ones that have no teleport leading to them, are coloured pink; typically asteroids are the purple/lavender colour 13 (6 in the Oust palette).
If the only link to an asteroid is e.g. from a code object that makes a teleport, then this will be shown as orphaned (hence "Tether Training" in the picture).
OustEd makes no attempt to stop asteroid fields growing too big for a PICO-8 cart. In theory Oust should cope with asteroid fields up to 0x4300=17,152 bytes in size, but I suspect the real maximum size is much smaller than that. I really need to test that and add it as a limit.
The CORVUS field in the game is 6433 bytes at time of writing, but it is compressed and packed in with the other game data so isn't a good measure.
Press Q to mute and unmute the game music. The music for the current asteroid will play if music is unmuted.
Press Return or P to bring up the menu for this view.
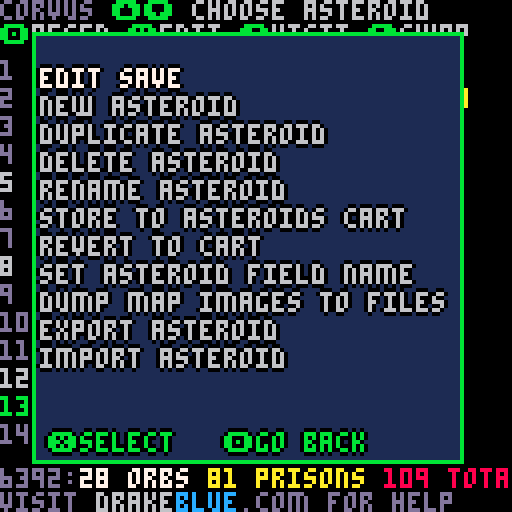
Use up and down and then X to select an option or Z to return to the Asteroid Select View. As with all the menus, hold Return or P to open the usual PICO-8 menu.
EDIT SAVE: opens the Edit Save View. See below.
NEW ASTEROID: adds a new asteroid prior to the current one. It is an incomplete asteroid called NEW and will need editing to function in-game.
DUPLICATE ASTEROID: makes an exact copy of the current asteroid.
DELETE ASTEROID: deletes the current asteroid. OustEd will try to warn if any teleport destinations have been wiped out and correct any teleports that point otherwise. But sometimes that doesn't work very well.
RENAME ASTEROID: opens an interface to change the name of the current asteroid.
STORE TO ASTEROIDS CART: will save the asteroid field to db_oust_levels.p8 as they are in memory now. Note: a db_oust_levels_backup.p8 will be created as a copy of an existing save.
REVERT TO CART: restarts the editor, reloads the asteroid field and loses any unsaved changes.
SET ASTEROID FIELD NAME: opens an interface to change the name of the current asteroid field. Try to use a unique name as this name is appended to the game save file when playing Oust. The embedded field is called CORVUS.
ADD EXTRA MUSIC: enable extra custom music tracks for this asteroid field. See Appendix III: Extra Music for more information
REMOVE EXTRA MUSIC: removes any extra custom music tracks from this asteroid field. See Appendix III: Extra Music for more information
DUMP MAP IMAGES TO FILES: dumps out all asteroids to png fiels a screen (8x8 tiles) at a time. The output files can be assembled into maps similar to those available on this website.
EXPORT ASTEROID: dumps out hex data for the current asteroid to the terminal output and to the clipboard. Use this to move asteroids between different field files.
IMPORT ASTEROID: imports hex data exported by the prior option as the final asteroid in the current asteroid field.
EXPORT FIELD: exports the entire asteroid field to the console as lua code.
Regenerate View
This view is used to set global values for the asteroid, mostly pertaining to the procedurally generated elements.
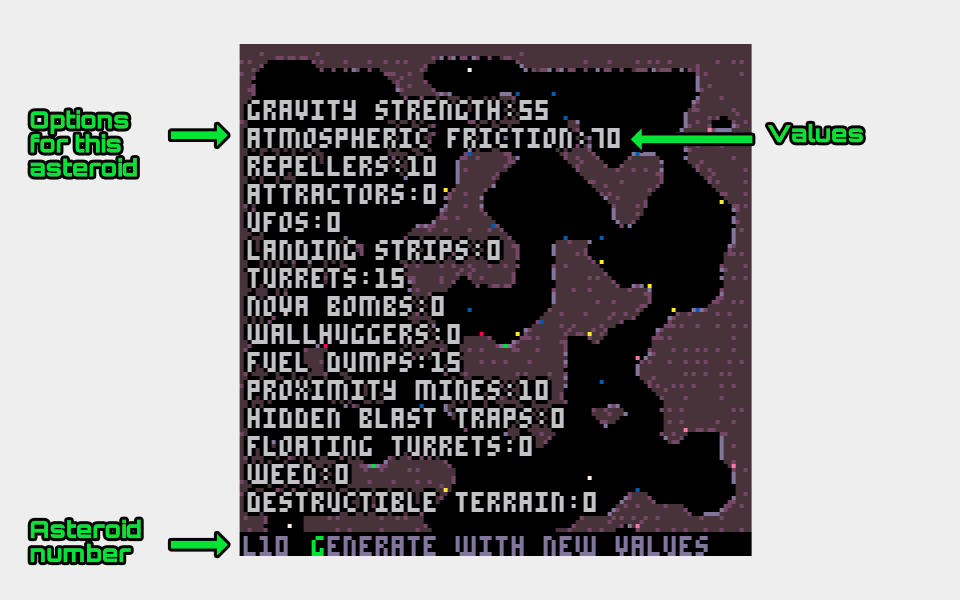
Use the Up and Down arrows to highlight a value. The left and right arrows change the value for that option.
Once you've made changes to values, press G to trigger the regeneration.
Some values when changed will turn red. This indicates that a full regeneration wiping out any manual edits in Edit View will be triggered if G is pressed.
Hold Z and press G to attempt to regenerate the asteroid without removing any manual changes. Beware: this may make a lot of "bad" objects and cause problems in the editor and the game.
Press F to force a regeneration that wipes any manual changes.
Hold X to remove the values from view and show the mini map.
Press Q to mute and unmute the game music. The music for the current asteroid will play if music is unmuted.
Pressing Y gives the option to return to the Asteroid Select View.
Pressing E will switch to Edit View for this asteroid.
The Values
When a value for choosing the number of objects to procedurally generate is highlighted then the positions of thoes objects will flash on the mini map.
MAP WIDTH: the width in 16 pixel tiles of this asteroid's map. Larger values will mean slower generation times, sparser asteroids and larger asteroids (in bytes), especially if combined with a large Map Height value. The number of bits used to store all of the x coordinates of any manual edits reflects the size of this value e.g. a map width of 75 means 7 bits will be required to store any x coordinates. This affects manual cave edits, procedurally generated object deletions and manually placed objects.
Min: 8
Max: 255
Def: 31
MAP HEIGHT: the height in 16 pixel tiles of this asteroid's map. Larger values will mean slower generation times, sparser asteroids and larger asteroids (in bytes), especially if combined with a large Map Width value. The number of bits used to store all of the x coordinates of any manual edits reflects the size of this value e.g. a map height of 75 means 7 bits will be required to store any x coordinates. This affects manual cave edits, procedurally generated object deletions and manually placed objects.
Min: 8
Max: 255
Def: 31
CA ITERATIONS: the number of cellular automata iterations the cave data undergoes to produce the cave topology for this asteroid. Higher values produce a smoother, "blobbier" effect. Generation can be noticeably slower for large values on large asteroids.
Min: 0
Max: 7
Def: 3
MAP DENSITY: affects the ratio of empty space to rock in the cave generation. Specifically it is the threshold at which point the initial random generation of values chooses an empty space or filled space.
Min: 0
Max: 255
Def: 110
RND SEED CAVES: the random number seed used to generate the initial map which is processed using cellular automata. Varying this should produce different maps, with similar density and smoothness.
Min: 0
Max: 255
Def: 0
RND SEED OBJECTS: the random number seed used to generate the procedurally generated objects in the asteroid. There is only one seed for all PG objects. Varying this changes where any objects are generated. Try various values until objects are almost all in suitable locations then use some manual deletion of PG objects and add manual objects to generate the asteroid you want.
Min: 0
Max: 255
Def: 0
PALETTE: choose a colour scheme for the caves in the asteroid. Palette 13 is the green-only one used for the training asteroids.
Min: 0
Max: 31
Def: 0
Simulator asteroids are intended to be the first asteroids in a field. Only once the player progresses to a non-simulator asteroid will Oust track mission completeness. If you add a simulator asteroid after a normal asteroid, especially if you place prisons or orb holders in those asteroids the game may behave strangely in regard to tracking mission percentage and it might not be possible for the player to reach 100% and completet the asteroid field.
GRAVITY ANGLE: the angle at which gravity affects objects in this asteroid. 0 is downward, 63 is to the right, 127 is upward and 192 is to the left.
If Rotating Gravity is chosen below then this value affects the speed at which gravity rotates: 0 means very fast anti-clockwise, 127 means stationary, 255 means very fast clockwise.
Gravity directions too far away from down can make landing the player ship difficult/impossible
For asteroids with prisoners a roughly downward gravity is required or the prisoners can behave erratically - typically they can rise out of the asteroid entirely and there's no way for the player to rescue them, essentially breaking the game.
Min: 0
Max: 255
Def: 0
GRAVITY STRENGTH: the strength of the gravitational force in this asteroid. Very high values are beyond the ability of the ship to resist and are only used in the transit asteroids in the main game.
Strong gravity combined with low Atmospheric Friction can make falling deadly for prisoners.
A non-zero value for Gravity Strength is required for prisoners to stay on the cave surface. The game may not cope with prisoners floating away...
Min: 0
Max: 255
Def: 75
ATMOSPHERIC FRICTION: simulates the thickness of the atmosphere in the asteroid. Higher values will slow the player ship, prisoners and orbs on the tether, where low values will mean they float with less resistance.
Low Atmospheric Friction combined with high Gravity Strength can make falling deadly for prisoners.
Min: 0
Max: 255
Def: 55
REPELLERS: the number of repeller objects to attempt to generate in this asteroid.
Min: 0
Max: 255
Def: 0
ATTRACTERS: the number of attractor objects to attempt to generate in this asteroid. These generate on slanted and horizontally flat tiles including downward facing tiles.
Min: 0
Max: 255
Def: 0
UFOS: the number of UFO objects to attempt to generate in this asteroid. These generate only in empty space tiles.
Min: 0
Max: 63
Def: 0
LANDING STRIPS: the number of landing strip objects to attempt to generate in this asteroid. These generate only on flat horizontal upwar facing tiles.
The player needs to land on these to rescue the prisoners. Procedurally generating them is one of providing them with a single number.
Min: 0
Max: 255
Def: 0
TURRETS: the number of turret objects to attempt to generate in this asteroid. These generate only on diagonally slanted tiles.
Min: 0
Max: 255
Def: 0
NOVA BOMBS: the number of nova bomb objects to attempt to generate in this asteroid. These generate in empty tiles only.
Min: 0
Max: 63
Def: 0
WALLHUGGERS: the number of wallhugger objects to attempt to generate in this asteroid. These generate in empty tiles only.
Min: 0
Max: 63
Def: 0
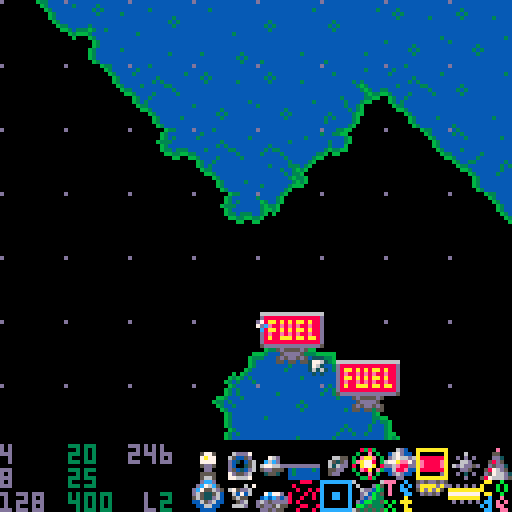
FUEL DUMPS: the number of fuel dump objects to attempt to generate in this asteroid. These generate on upward facing flat and slanted tiles.
Min: 0
Max: 255
Def: 0
PROXIMITY MINES: the number of proximity mine objects to attempt to generate in this asteroid. These generate in empty tiles only.
Min: 0
Max: 255
Def: 0
HIDDEN BLAST TRAPS: the number of hidden blast trap objects to attempt to generate in this asteroid. These generate in all cave wall tiles except for verticals.
Min: 0
Max: 255
Def: 0
FLOATING TURRETS: the number of floating turret objects to attempt to generate in this asteroid. These generate in empty tiles only.
Min: 0
Max: 255
Def: 0
WEED the number of weed objects to attempt to generate in this asteroid. These generate in all cave wall tiles except for verticals.
Min: 0
Max: 255
Def: 0
DESTRUCTIBLE TERRAIN: flag to indicate if cave walls can be destroyed by nova bombs. 1 means destructible.
Min: 0
Max: 1
Def: 0
ROTATING GRAVITY: flag to indicate if gravity in this asteroid is rotating or not. 1 means rotating gravity. Use Gravity Direction to set the speed of rotation.
Min: 0
Max: 1
Def: 0
TWEAKS PRE PG OBJECTS: flag to indicate if manual edits (tweaks) to the cave topology are applied before or after objects are procedurally generated. 1 means they are.
If you don't want PG objects to "move" when editing the cave walls then leave this as 0. If you don't want objects to be generated in "bad" places then set this to 1.
Min: 0
Max: 1
Def: 0
RANDOM PG OBJECT PARAMETERS: flag to indicates that any PG objects that can accept parameters should be passed random values. 0 means all such objects are generated with a parameter of 0. A value of 1 means that they recieve the random parameter value.
Affected object kinds are: proximity mines and floating turrets.
Min: 0
Max: 1
Def: 0
MUSIC: indicates which music track to play in this asteroid. There are 9 tracks, value 1 and 2 both indicate track 1, but starting at different positions.
Min: 0
Max: 1
Def: 0
Pressing Return or P on this view will bring up the following menu options:
Regenerate and Edit Menu
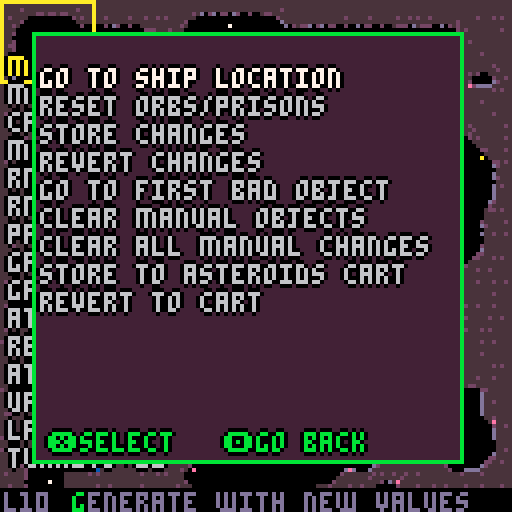
These options are the same in the Regenerate View and the Edit View.
GO TO SHIP LOCATION: moves the edit view to the ship's location.
RESET ORBS/PRISONS: sets all orbs to unretrieved and all prisoners to unrescued for this asteroid.
STORE CHANGES: stores changes to memory. This makes changes persist after returning to the Asteroid Select View, but doesn't store them to the cart. If STORE TO ASTEROIDS CART is not selected subsequently then the changes won't be available if OustEd has stopped or in the game.
REVERT CHANGES: reloads all changes from memory for this asteroid. Any unstored changes will be lost.
GO TO FIRST BAD OBJECT: moves the edit view to the first "bad" object in memory, if there is one.
CLEAR MANUAL OBJECTS: removes any objects placed manually i.e. those not procedurally generated.
CLEAR ALL MANUAL CHANGES: removes any objects placed manually, any caves topology edits and any deletes of procedurally generated objects.
STORE TO ASTEROIDS CART: Stores the asteroid field, including this asteroid, to the db_oust_levels.p8 file overwriting whatever was there previously. A db_oust_levels_backup.p8 file is generated of the previous file.
REVERT TO CART: reverts all asteroids in the field, including the current one, to the contents of the db_oust_levels.p8 file.
Edit View
The edit view has two modes which you can switch between by pressing the E key: cave edit mode and object edit mode.
You can move the map view by small increments using the direction keys. Hold Z to move by larger amounts (and show the map).
To exit back to the Asteroid Select View press Y and confirm.
Press R to enter the Regenerate View for this asteroid.
Press RETURN or P to access the Regenerate and Edit Menu
Cave Edit Mode
In this mode you can directly edit the topology of the caves in an asteroid. Click on the top part of the view to toggle the empty/filled state of each coordinate on the map. The green "manual edit" markers show where you've edited.
Each change will add to the size in bytes of the asteroid so be careful not to make too many edits in this way. It's advisable to use it only to "tweak" an asteroid that's already pretty close to what you want. The larger the asteroid, the more bits are used for each edit. For example, a 15 by 15 asteroid will use 4+4=8 bits per edit whereas a 127 by 63 asteroid will use 7+6=13 bits each.
Also in this mode you can set the placement of the player's ship in the current save game by holding X then clicking on a teleport or checkpoint. After accepting the change of location by pressing Y an icon of the ship should be visible superimposed on the teleport or checkpoint indicator. If you run Oust and load this save slot the ship should appear where you've chosen so you can test this asteroid from that starting point.
The starting location of the ship when OustEd is run is shown this way too. As discussed above concerning save games, if you run Oust, without exiting OustEd and the location changes as a result of playing then this won't be automatically updated in OustEd and typically changing the ship location in OustEd won't update the save game back in Oust.
Object Edit Mode
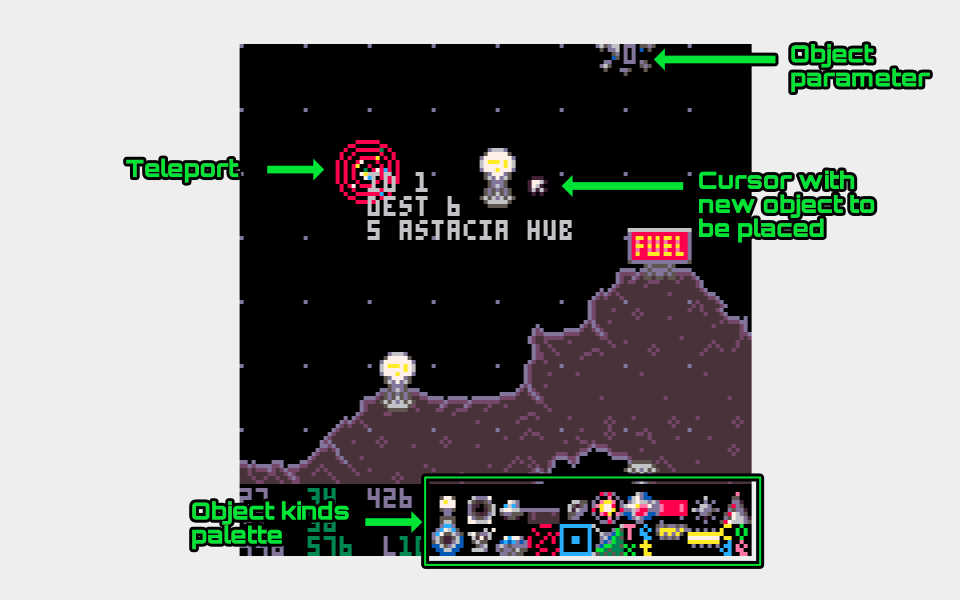
Pressing E in Cave Edit Mode enters Object Edit Mode and shows the object palette. Click on an object kind to select it. You will be able to place objects in otherwise unoccupied point in the upper, map portion of this view with the left button.
OustEd doesn't try to stop you adding objects in places they probably shouldn't go, but will mark them as potentially 'BAD'. BAD objects may behave as you intend in the game, but they may not work like you want or even crash Oust entirely.
For a long time during development Oust would crash if it hit a BAD object because the pixel offset needed to place it wasn't present in the code and I didn't want to use the tokens to make the game place it somewhere anyway. Near the end I noticed it was pretty trivial to allow these objects without crashing the game and I had far more idea of how many tokens were available so I made the change to allow objects to be placed anywhere, but still marked as "BAD". I don't rule out making some tweaks to make this nicer to work with in the future.
To move an already placed object, hold X and left-click the object that you want to move in the map view. That object should flash. Left-click at an unoccupied point on the map and the object will be moved to that position.
When you hold X a white circle will show the place-point of each visible object, without any offset. Typically these will be at the top left or centre of the object. A red "P" will be shown beside procedurally generated objects.
Holding Z will show the mini-map.
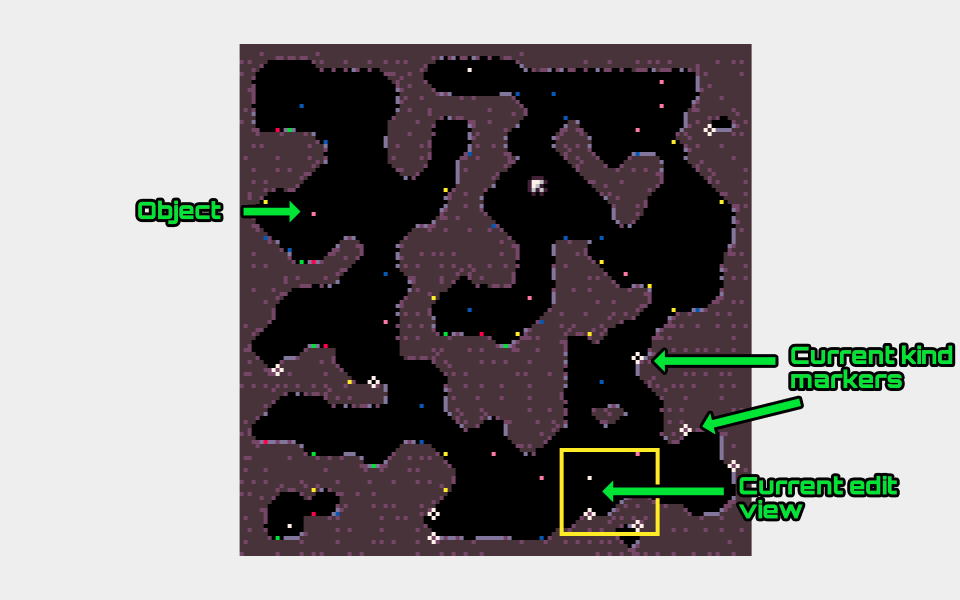
Objects are shown as dots on the mini-map. Objects of the kind currently selected will flash with a small circle/cross: a hollow circle shows procedurally generated objects, filled circles indicate manually placed objects.
Clicking on the map will move the edit view to that location. While holding Z to show the map, using the arrow keys will move the view a screen at a time.
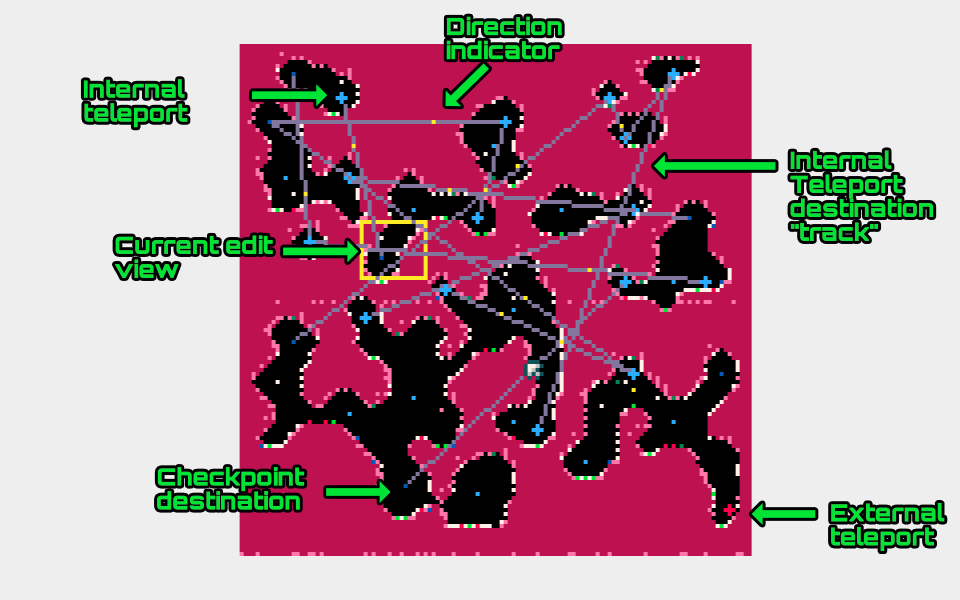
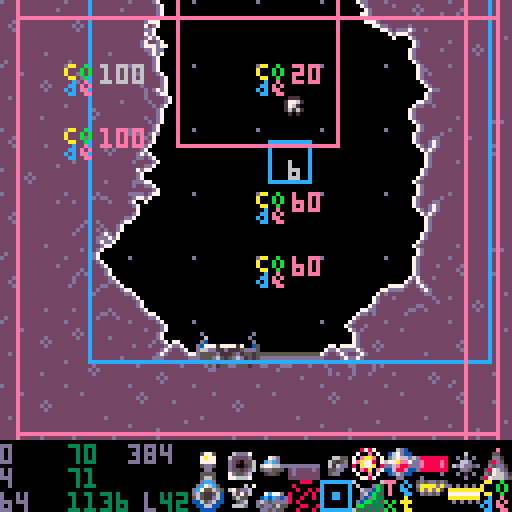
Teleports on the map
Showing the map when the teleport object kind is selected reveals more information than for other kinds of object in the form of colours and "destination tracks".
Green markers show internal teleports that have destination 0 i.e. a random destination.
Red markers show "external teleports" i.e. those with destinations external to the current asteroid.
Blue markers show "internal teleports" that have a destionation within the current asteroid.
Internal teleports also have "destination track" lines drawn between them and the teleport or checkpoint that is their destination. A yellow dot travels along these lines to show their direction.
Object Kinds
Using the object palette you can add twenty one different kinds of object to your asteroids.
This is the only way to add orb holders, prisons, teleports, checkpoints, transmitters, text, keys, gates, fences and code objects. Weed can only be added to an asteroid procedurally.
Repellers
Kind ID: 1
Repellers exert a negative gravity effect on the player's ship if it gets within 80 pixels of one (the PICO-8 screen is 128x128 pixels).
They should be placed and can be procedurally generated on horizontal and diagonal cave walls. If the wall is downward facing then the repeller sprite is flipped.
Repellers take one shot to be destroyed, but can be restored by Wallhuggers as they pass.
Attracters
Kind ID: 2
Attracters exert a gravity effect on the player's ship if it gets within 112 pixels of one (the PICO-8 screen is 128x128 pixels).
They should be placed and can be procedurally generated on horizontal and diagonal cave walls. If the wall is downward facing then the attracter sprite is flipped.
Attracters take two shots to be destroyed, but can be restored by Wallhuggers as they pass.
UFOs
Kind ID: 3
UFOs will chase the player, dodging about while firing shots at them.
They should be placed and can be procedurally generated in empty space tiles.
UFOs take five shots to be destroyed.
Landing strips
Kind ID: 4
Landing strips are where the player ship can land and where prisoners can be board the ship. It is important to make sure at least one of these is reachable from every prison you place otherwise the prisoner can't be rescued and the asteroid field won't be possible to complete.
They should be placed and can be procedurally generated in upward facing horizontal tiles only.
Landing strips are indestructible except for nova bomb blasts on asteroids where DESTRUCTABLE TERRAIN is set to 1.
Turrets
Kind ID: 5
Turrets are stationary enemies that fire shots at the player ship.
They should be placed and can be procedurally generated on diagonal cave walls.
Turrets take one shot to be destroyed, but can be restored by Wallhuggers as they pass.
Nova bombs
Kind ID: 6
Nova bombs can be collected by the player ship and used as a powerful weapon.
If the DESTRUCTABLE TERRAIN flag is set on an asteroid then they can destroy cave walls and objects on them as well in addition to their usual destructive capabilities.
They should be placed and can be procedurally generated on empty space tiles.
Wallhuggers
Kind ID: 7
Wallhuggers are moving enemies that follow the cave walls of the asteroid. At random intervals they will launch at a right angle to the surface they're on and fly straight through space until they encounter another wall.
They should be placed and can be procedurally generated in empty space tiles. They initially fly to the right until they hit a wall.
Wallhuggers will fire shots at the player's ship.
Wallhuggers take ten shots to destroy. They will fire at greater frequency each time they're shot.
When following a cave wall, if a wallhugger encounters a damaged turret, repeller or attracter then it will repair that object.
Fuel dumps
Kind ID: 8
Fuel dumps can be scooped by the player to replenish fuel for their ship.
They should be placed and can be procedurally generated on upward facing cave walls.
Proximity mines
Kind ID: 9
Mines are obstacles that explode into multiple shots when the player ship gets too close to them.
They should be placed and can be procedurally generated on empty space tiles.
Mines take one shot to destroy, setting off their usual explosion.
Mines (like floating turrets) can have a parameter set determining the direction in which they will move. A moving mine will travel until it reaches a cave wall and then will reverse direction.
For manually placed mines, hover the mouse cursor over the mine for which you want to set the direction of movement then use the < and > keys to change the direction chosen. A moving dot and the parameter number indicate the direction chosen.
The possible values are:
Stationary
Up
Up and right
Right
Down and right
Down
Down and left
Left
Up and left is not selectable (there's no more room in 3 bits to store a ninth value).
If the option RANDOM PG OBJECT PARAMETERS is set to 1 then procedurally generated mines will have a random movement parameter chosen from the above list.
Kind ID: 10
These are stationary obstacles that will reveal themselves and explode into shots if the player gets too close.
They should be placed and can be procedurally generated on horizontal cave walls, floors or ceilings.
They are indestructible except by being triggered or by nova bomb blast on asteroids with the DESTRUCTIBLE TERRAIN flag set to 1.
Floating turrets
Kind ID: 11
Floating turrets are enemies that fire shots at the player ship.
They should be placed and can be procedurally generated in any empty space tile.
Floating turrets take one shot to be destroyed.
Like proximity mines, they can be set to be stationary or move. A moving floating turret will travel until it reaches a cave wall and then will reverse direction.
For manually placed floating turrets, hover the mouse cursor over the turret for which you want to set the direction of movement then use the < and > keys to change the direction chosen. A moving dot and the parameter number indicate the direction chosen.
The possible values are:
Stationary
Up
Up and right
Right
Down and right
Down
Down and left
Left
Up and left is not selectable (there's no more room in 3 bits to store a ninth value).
If the option RANDOM PG OBJECT PARAMETERS is set to 1 then procedurally generated floating turrets will have a random movement parameter chosen from the above list.
Weed
Kind ID: 12
The green weed that infests some of the levels of Oust and can be procedurally generated from the Regenerate View. It can't be added manually so there is no option for it in the object kinds palette in Object Edit Mode.
Orb holders
Kind ID: 13
Orb holders are where the clystron orbs that the player must retrieve appear.
They should be placed on upward or downward facing walls.
Care needs to be taken to make sure that orb holders are placed where the orb they hold is possible to grab and tow back to a transmitter by the player.
An orb is drawn in the editor if the player has yet to retrieve it in the current save game. If there's no orb shown then the player has retrieved that orb successfully.
Left-clicking on the orb holder will toggle this state in the current save game which is useful for testing.
Prisons
Kind ID: 14
Prisons are where prisoners are kept in solitary confinement.
They should be placed on horizontal, upward facing cave walls only.
Prisons take one shot to destroy at which time they'll release their prisoner.
The prisoner needs to be able to run to a landing strip in the asteroid where the player can land to rescue them.
Prisoners can't climb a cliff of more than a pixel so may get stuck very easily. Depending on the GRAVITY STRENGTH and ATMOSPHERIC FRICTION, they also may survive huge falls or not survive even a short drop.
Prisons that have had their prisoners successfully rescued are shown broken, otherwise they appear whole.
Left-clicking on the prison will toggle this state in the current save game which is useful for testing.
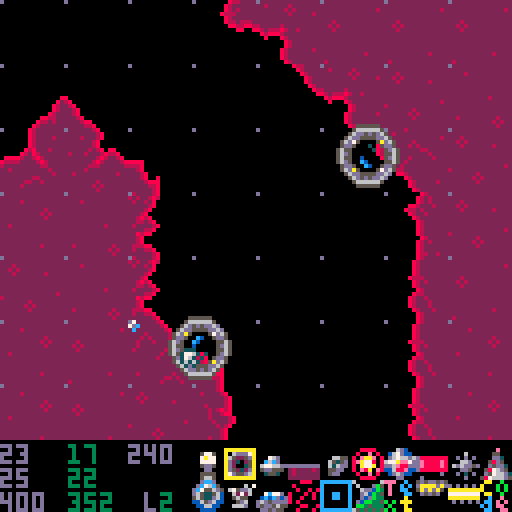
Teleports
Kind ID: 15
Teleports are objects that instantly transport the player ship to another teleport or a checkpoint in the same asteroid or in another asteroid.
They should be placed in empty space.
Left-clicking on the teleport will allow you to edit numbers for the teleport's DESTINATION INDEX which refers to the ID of the teleport or checkpoint within an asteroid and then the teleport's DESTINATION ASTEROID, which indicates the asteroid that the game should look for that index.
A DESTINATION INDEX of 0 will mean that the game will select a teleport or checkpoint at random from those within the asteroid set by the DESTINATION ASTEROID value.
A DESTINATION ASTEROID value of 0 means that the current asteroid will be used without re-warping to the asteroid; the teleport is an "internal" teleport. The game will not regenerate the asteroid so all objects will remain as they are.
A non-zero value for the DESTINATION ASTEROID indicates warping to that asteroid will occur, even if the number chosen is the same as the current one. The asteroid will be regenerated and all objects will be in their default positions.
Note: the game does no error checking on destination and asteroid values so it is possible to set a destination on a teleport that doesn't exist and may crash Oust if the player tries to use that teleport.
OustEd will attempt to keep teleports headed to the correct destination over asteroids when new teleport objects, checkpoint objects or asteroids are added, re-ordered or removed, but it's best to check that there are no problems with your teleports after such changes.
If a teleport's destination is removed entirely then OustEd will try to show a warning.
Showing the map when the Teleport object kind is selected reveals more information than for other kinds of object in the form of colours and "destination tracks".
Green markers show internal teleports that have destination 0 i.e. a random destination.
Red markers show "external teleports" i.e. those with destinations external to the current asteroid.
Blue markers show "internal teleports" that have a destionation within the current asteroid.
Internal teleports also have "destination track" lines drawn between them and the teleport or checkpoint that is their destination. A yellow dot travels along these lines to show their direction.
Checkpoints
Kind ID: 16

Checkpoints are stationary areas where the ship can be respawned or teleported to.
They should be placed empty space tiles.
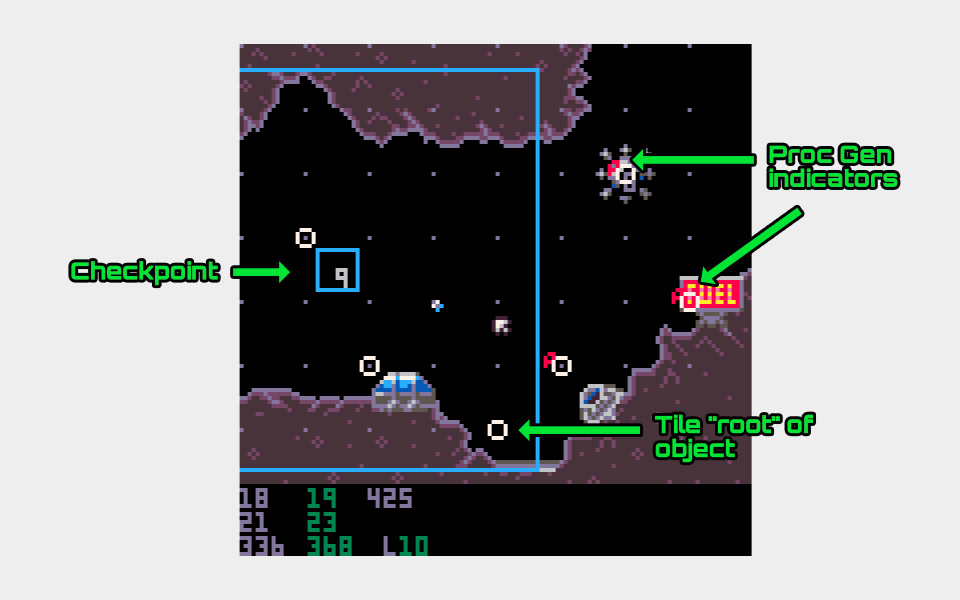
They are invisible in the game, but represented in the editor by large blue squares with a smaller blue square at their centre and an ID number.
The large square indicates the area that the ship needs to enter in order to activate the checkpoint and the small square is where the ship will respawn if that checkpoint is the current one i.e. if the ship enters the large square and is destroyed then it will respawn at the centre in the small square.
Checkpoints can also be targeted by teleports by use of the checkpoint's ID. Checkpoint IDs are integers starting from one higher than the IDs of teleports in an asteroid and are assigned automatically.
Adding a teleport will increase the value of all checkpoint IDs by one and likewise deleting a teleport will decrement checkpoint values. OustEd will try to account for this by updating any teleport destination values when change are made, but testing is advised. Note that any IDs used by code objects will need to be changed manually.
If the player ship is recorded as being at a particular checkpoint in the current save game then a ship icon will be visible by that checkpoint (as shown in the screen shot).
The location of the ship may be set to a checkpoint in Cave Edit Mode.
Transmitters
Kind ID: 17
Transmitters are where the player must return orbs and prisoners to complete their mission. Landing at the transmitter also replenishes the ship's fuel.
They should be placed on horizontal, ground tiles, preferably in an asteroid with gravity that's pulling downwards. Try to place them so that the landing strip at the right of the transmitter is poking out into empty space otherwise there is a danger that the ship won't be able to land safely there.
Transmitters are indestructible.
Text
Kind ID: 18
Text objects can be used to add signs or other messages for the player. They can use PICO-8's P8SCII control codes to allow different colours, sizes and other effects. See places like these for more info on P8SCII: here, here or here.
Text objects should be placed in any empty space. They do not interact with the player's ship or other objects in the game.
Bear in mind that each character (including control characters) takes up a byte of space in your asteroid cart so lots of text can quickly use up storage.
Also, text is only drawn when it is within a 512 pixel square of the player's ship so large amounts of text can "pop" into view in an undesirable way if you aren't careful about it.
To use "puny mode" and access the smaller set of characters that PICO-8 has (which unintuitively correspond to capitals in the code) use the TAB key to enter and exit it again.
Keys
Kind ID: 19
Keys are collectible items that allow the player to open gates.
There are eight colours of keys that may be placed and collected.
A key that has been placed will only be visible to the player until they pick up a key of that colour. For example, if you place 3 red keys in an asteroid then if the player picks up one of them the other two will appear to have vanished.
The key colours correspond to the following IDs:

Gates
Kind ID: 20
Gates are sliding barriers to the player that will only move from blocking them if they have found a key of the matching colour. They can be of the same eight different colours as keys.
Gates are expected to be placed on right facing or up facing wall spaces with a gap smaller than four spaces to work correctly.
Codes
Kind ID: 21
Code objects define a square which, when the player ship enters it, trigger functions with parameters to be run.
The name "code" is a bit of an exaggeration, but fits the icon in the editor better than "crude strings with functions and parameters in sequence and not a lot more".
They should be placed in empty spaces, although really it doesn't matter too much.
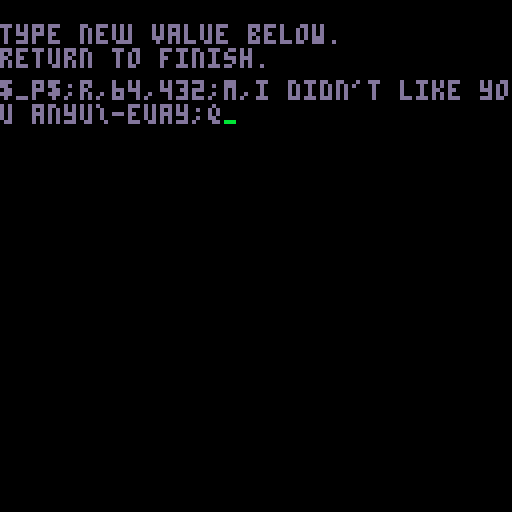
Once placed, left click the object while in Object Mode to edit its code expression and then its range parameter.
Bear in mind that each character used (including control characters) takes up a byte of space in your asteroid cart just like text objects do.
The range of the trigger area of each code object varies from 0 to 127 and in game covers a square centred on the code object's location of range x 4 + 4 or 4 to 512 pixels in size. The flickering square of the code object in OustEd shows this range of where the code snippet will be triggered if the player's ship enters it.
Once triggered the string is interpreted by the game as a list of function calls where f1,p1,p2;f2,p3,p4 indicates "call function f1 with parameters p1 and p2 followed by call function f2 with parameters p3 and p4" or the code "f1(p1,p2)f2(p2,p3)". So the ";" is a separator between functions, the "," between functions and parameters.
The snippet is executed every frame for which the ship is within its range until the object is deleted or until the ship leaves the range.
Any function available to the _ENV of the "drawtop" function of the code object is available to be used, but there's no means of evaluating any expressions, storing to variables or (real) use of conditionals. You are limited to what little the game provides and your own ingenuity. A lot of trial and error is likely required before you'll see the results that you want and there's plenty that's just not possible. A lot of experimentation was needed to make the original CORVUS field, expecially the training and final few asteroids.
Global variables can be used as parameters by surrounding them by dollar signs (e.g. $Gfriction$ gets the current value for the atmospheric friction in the asteroid). Some of these are listed below.
To use "puny mode" and access the smaller set of characters that PICO-8 has (which unintuitively correspond to capitals in the code) use the TAB key to enter and exit it again.
Selected Functions
There are some functions from the game that are helpful and a few functions and expressions provided specifically for use with code objects.
Parameters may be optional: testing is the best way to determine which at this time.
q
Deletes this code object.
Effectively makes the snippet run once instead of repeatedly executing every frame whenever the player is within its range.
m,--message--
Teleprints a message, like the message showing the name of the asteroid or when a key is picked up. The message can use P8SCII.
Note: a code object is executed over and over when its range is entered and if the "m" function is called over and over it will never proceed past the first character (there's no queue, just a single active message at a time). It works best to have a "q" function to make the execution one time only or a "w" before or similar to get the message to display.
Example:
m,hello agent!;q
r,--x--,--y--,--range--
Deletes the objects at the pixel coordinates (--x--,--y--) in the asteroid within the specified range square --range--.
This can delete almost any object except for the player, including other code objects. Use with caution.
Example:
r,512,512,4;q
a,--kind--,--x--,--y--,--parameter1--,--parameter2--
Adds an object to the asteroid.
w,--frames--
Wait --frames-- number of frames. Each frame should take 1/60th second although Oust does occasionally drop some during collisions or explosions.
f,--units--
Subtract units of fuel from what's currently in the player ship's tank. This can be set to negative values to add fuel. If enough is removed the ship will explode and a player death will be recorded.
g,--x--,--y--
Go to location --x--,--y--. Relocates the ship to --x--,--y-- in the asteroid. --x-- and --y-- are measured in pixels.
j,--dest--,--asteroid--
Teleports the player ship to the --dest-- teleport or checkpoint in the asteroid specified.
Note: this works by adding a teleport to the asteroid where the player ship is and activating it, then deleting the teleport. The values passed are the same as the values for any other teleport so all the varieties of external, internal, internal random etc. are available.
p,--text--,--x--,--y--,--colour--
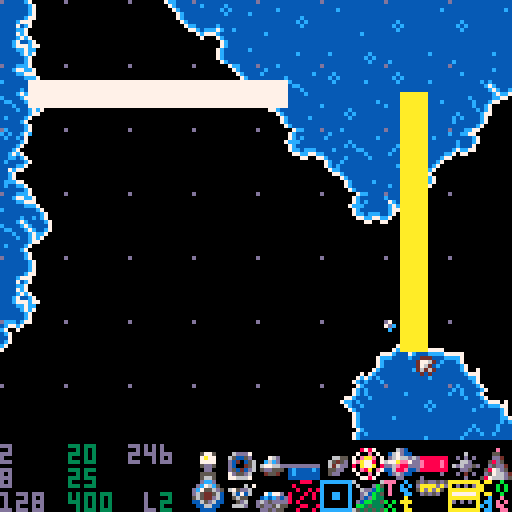
Prints outlined text to the screen coordinates (--x--,--y--) irrespective of the ship's location i.e. the origin (0,0) is always at the top left.
The training asteroids in CORVUS use this to annotate the game's interface.
n,--x--,--y--
Nudges the ship by the amount (--x--,--y--).
The --x-- and --y-- values are added directly to the ship's velocity effectively pushing it in the direction of a vector (--x--,--y--).
k,--key_num--: returns true if the specified key has been collected by the player.
Use this to run code conditional upon whether a particular key has been collected by the player or not. Any code after the "k,--key_num--" expression won't be run unless the player has that particular key.
The key colours correspond to the following IDs:
ap,--px--,--py--,--cols--,--n--,--pr--,--vx--,--vy--,--vr--,--l--,--lr--,--upd--
Adds particles at the position in pixels (--px--,--py--).
--cols-- is a list of colours that the particles shall be selected from. Values are separated by "|" signs.
Example: 8|9|10|15
--n-- indicates the number of particles to be generated.
--pr-- is a radius in pixels within which to vary the position of the particles centred around the position given by (--px--,--py--).
--vx--,--vy-- is the velocity of the particles in pixels per frame.
--vr-- is a random velocity component, also in pixels per frame.
--l-- and --lr-- are the life duration of the particles and a random life duration to be added to that, both measured in frames.
--upd-- is the update method or kind of particle chosen as a number 1, 2, 3 or 4.
Basic. Particles update according to their velocity, life etc. but will only collide with cave walls upon which the particles are deleted. They will fly through any other objects. They will be deleted if they get up to 200 pixels from the ship.
Screen. Particles update according to their velocity, life etc. and will collide with cave walls and other objects upon which the particles are deleted. They will be deleted if they get up to 100 pixels from the ship.
Dancing. Particles horizontal and vertical velocity swap randomly each frame to give a "dancing" effect. They don't collide. Teleports and the spark effect from orbs use this type of particle.
Circle. The only type that draws anything but single pixels. Draws an expanding circle centred upon the passed position. The life of this particle increases each frame by 3 and when it passes 100 the particle is deleted. Used for explosions and teleports.
gs,--angle--,--strength--,--rotate--
Set gravity to an angle and strength much the same as setting GRAVITY ANGLE, GRAVITY STRENGTH and ROTATING GRAVITY in Regenerate View
ss,--amount--
Shake the screen by the --amount-- value. 0 stops any screen shake.
mus,--track--
Sets the music to a particular track ranging from 1 to 10. If this track is already playing then the function will be ignored.
All the PICO-8 functions are also available and more from the Oust game code. I may extend this section to be more comprehensive in the future.
Selected Values
x,y
The position of this code object.
X,Y
The position of the player's ship
use TAB to enter these - they appear as the smaller "puny" characters.
Flags
Kind ID: 22
These are used to allow triggering of code from events in the game. The training asteroids in the game use these a lot.
_e: set true if all orbs have been retrieved and all prisoners have been rescued on entering an asteroid. This is the only flag that isn't nil on entering an asteroid and only set during play with it.
_d: set true when a prisoner is freed from a prison in this asteroid.
_o: set true if an orb is grabbed by the player.
_p: set true if a prisoner is collected by the player.
_t: set true if a transmitter activates from returning a prisoner or orb.
_k: set true if a prisoner is killed (e.g. by falling or the player).
_g: set true if a key is collected.
_s: set true if the ship is destroyed.
Example which shows a message when a prison is destroyed (freeing the prisoner inside), assuming the player is within the range of the code object.
_d;m,you've freed a prisoner!;q
Code snippets are run within coroutines. If the coroutine encounters an error then it stops (but doesn't crash the game). The flags/pseudo conditionals such as "_g" work because of this.
The _g value is initially nil (i.e. not a function and so causes an error when PICO-8 tries to call it like one). When the game detects a key has been grabbed then the _g value is set to a blank function (that does nothing, but doesn't cause an error) so that execution proceeds to the remainder of the expression in the object. Thus a crude "if key is grabbed then execute the remainder" kind of construct is possible.
I'd like to have implemented something better, but this was the best I could do within the token constraints at the time. It's crossed my mind that a little scripting language here could also be used to save enough tokens in the rest of the code to break even or even be a net win. I've so far not had the brain power to implement one.
Examine the later asteroids in the "CORVUS" field to see examples of these objects being used within the game.
Fences
Kind ID: 21
Fence objects can be used to stop prisoners running where they shouldn't; prisoners are blocked by them.
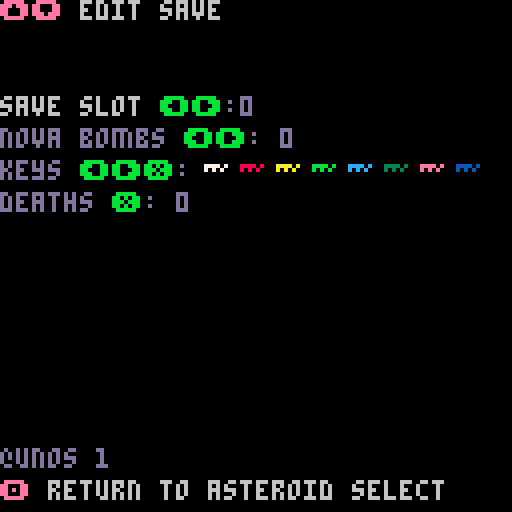
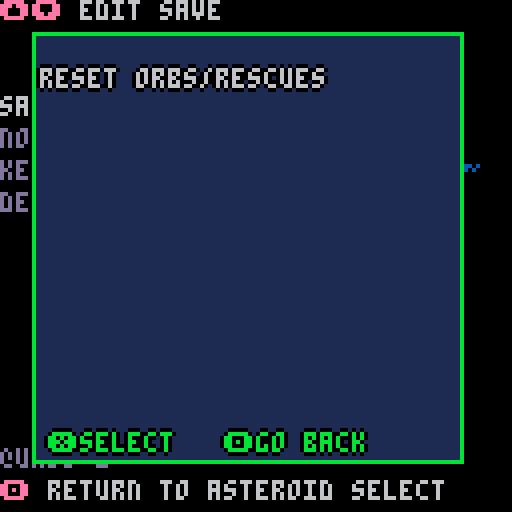
Edit Save View
Use this view to modify the current save game for testing purposes.
The options available are as follows:
SAVE SLOT: use LEFT and RIGHT to choose the currently active save slot from 0 to 3
NOVA BOMBS: use LEFT and RIGHT to change the number of nova bombs carried by the player ship. Valid values are from 0 to 8.
KEYS: use LEFT and RIGHT to highlight a particular key and X to toggle whether the player has collected that key or not.
DEATHS: press X to enter a value for the number of times the player's ship has been destroyed. Values can range from 0 to 32767.
Press RETURN or P to access the Edit Save Menu which only has one item at this time.
Choosing RESET ORBS/RESCUES will wipe any progress in the game for this save slot, mark all asteroids unvisited and return all orbs and prisoners to their original state without changing other values such as the location of the player ship, keys gained or number of deaths.
The following parts of a save game aren't modifiable from this view:
Whether an asteroid has been visited or not. Edit this from the Asteroid Select View using the LEFT direction.
The individual retrieval statuses of clystron orbs. Edit these via the Edit View.
The individual rescue statuses of prisoners. Edit these via the Edit View.
Appendices
Appendix I: Asteroid checklist
Things to check to make sure most asteroids are okay to play.
There must be a checkpoint or teleport that can be used by the player to enter the asteroid.
The very first entry into the field from a blank save will be at teleport target 3 on asteroid 1. If there are fewer teleport targets then the next highest is used (i.e. 2 before 1).
There must be a teleport that can be used by the player to exit the asteroid.
For an asteroid with prisons:
Gravity Angle must be downward (approximately 0) and Gravity Strength greater than zero.
For every one of the prisons in the asteroid, at least one of the landing strips needs to be accessible by the player and a prisoner running/falling to it so that the ship can land and a rescue can happen.
Be careful of places prisoners can get stuck - they don't climb well at all and they fall very easily.
For an asteroid with orbs, there needs to be enough room to tow each orb to the exit teleport. Going through a teleport with an orb results in the orb being in the same relative position to the ship at the other end of the jump so make sure there's enough empty space around the destination of a teleport through which the player is expected to bring an orb.
Appendix II: Colours
Oust uses the sixteen colours available in PICO-8 slightly differently to the default.
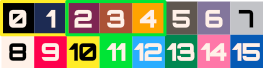
The first two colours (0 black and 1 another dark colour) are used by the background - collisions don't occur with these colours.
The next three colours (2, 3, 4) are used to draw the asteroid's caverns and are changed depending on the PALETTE for each asteroid chosen in the Regenerate View.
The remaining colours (5 to 15) remain constant on each asteroid and are as shown here.
Appendix III: Extra Music
Oust has 10 options for in-built tracks (id 0 to 9) available to be assigned per asteroid (or enabled via code objects). These tracks can be augmented for external asteroid fields by creating an extra_music.p8 file and placing it in the cstore location.
When the ADD EXTRA MUSIC option is selected from the Asteroid Select View Return menu it enables a flag in the asteroid field data that tells the editor to pull from a file called extra_music.p8 in he cstore location that holds tracks of PICO-8 music and sfx for that music.
The editor needs to know which PICO-8 music record is where a track starts so when choosing this option, it will immediately ask for the user to enter this number. For each track (or starting point for a track) you want, enter that number and press Return. Enter 255 to finish entering these numbers.
When the asteroid field is saved to cart this music data is appended to the asteroid data so that Oust (the game) can pull it in as part of loading the asteroid field. You may need to save the asteroid field to cart after enabling this option for the extra tracks to be accessible
From the Regenerate View menu, the extra music tracks can be selected for a level by setting the music option to values above 9. The asteroid will need to regenerated with G (or similar).
Making extra music tracks
Extra music tracks can be composed using the usual PICO-8 tracker, with the only real restrictions being:
Only sfx 0 to 57 inclusive can be used. The remaining sfx are used by the game for effects.
If the size of your asteroid field's data and music combined is larger than a PICO-8 cart (16KB), then the end of the music data will not be included and PICO-8 is likely to play some odd sounds instead of your music.